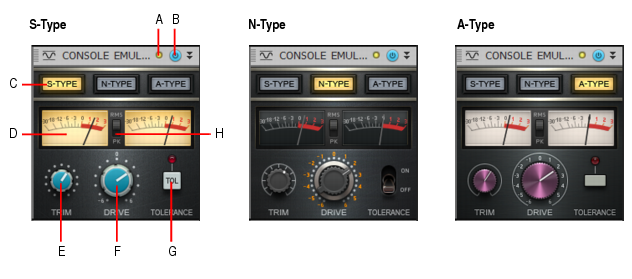
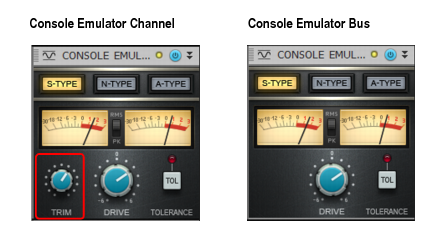
Cakewalk // Documentation // SONAR X2 // Console Emulator module
Table of Contents Previous Next Index

ProChannel (Producer only) ► Console Emulator module

A. Clipping LED B. Console Emulator enable/disable C. Emulation mode D. Output VU meters (left and right channels) E. Trim (not available in bus module) F. Drive G. Tolerance H. RMS/Peak meter toggle
When recording to analog tape, the mixing console is the centerpiece of the studio. The audio signal is affected as it passes through the circuitry of the console. Each console employs a different design and components, which adds to the sonic imprint of each console. There are various elements that define the sound of each console.
Digital audio is often accused of lacking “character”. Although mixing entirely inside a computer (often referred to as “mixing in the box”) has many benefits, it can sometimes lack the character of using an analog mixing console.
The Console Emulator module emulates the sonic characteristics of three classic mixing consoles. This has nothing to do with EQ and compression, but rather mimics the subtle non-linear distortion and noise that occurs when passing an audio signal through a mixing console’s analog circuit.
Just like an analog console, the overall sound character is the sum of all the separate processing stages. Depending on the console type and settings, some of the benefits you may experience include:
list-image
Console Emulator Channel. This version is designed for individual tracks.
list-image
Console Emulator Bus. This version is designed for buses. It contains the same controls as the Channel version, except it does not have a Trim control.
list-image
Mode. Selects the desired console emulation mode. For each mode, the Console Emulator module closely resembles the hardware it is modeled after.
list-image
S-Type. Emulates a clean and transparent British console that is popular among mixing engineers in rock and pop genres. This console has potentially been used on more platinum selling albums than all other consoles combined.
list-image
N-Type. Emulates a British console that is used in legendary recording studios, including Abbey Road, The Village, Ocean Way, and Skywalker Sound. This console is warm and has a rich low end.
list-image
A-Type. Emulates a revolutionary British console, of which only 13 consoles were ever built. This console was made famous at Trident Studios and Cherokee Studios. This console has a brighter top and less lows than the N-Type console. Some consider this best sounding console of all time.
list-image
Clipping LED. Shows if the input signal to the Console Emulator module is clipping. If there is any distortion in the ProChannel signal chain, the clipping LEDs let you identify where the clipping occurs.
list-image
Console Emulator enable/disable . Enables/disables the Console Emulator module.
list-image
Output VU meters. These meters are calibrated to function responsively, just like real-world meters. These meters fully support proper gain-staging needed for professional mixing situations and let the user make a better judgment of the volume needed for a particular track.
list-image
RMS/Peak. The VU meters can be switched to show RMS or Peak levels. Choose RMS to display more of an average of the amplitudes that occur in a complete cycle of a frequency. RMS, or Root-Mean-Square, is a little over seventy percent of peak level. Choose Peak to display the highest amplitude in the signal that occurs in a complete cycle of a frequency.
list-image
Trim. Adjusts the input gain. The valid range is 0% to 100% and the default setting is 0%. This control is only available in the Console Emulator Channel module, not in the Console Emulator Bus module.
list-image
Drive. Adjusts how much of the pre-processed input signal enters into saturation. For example, in an analog hardware mixer, if you put all the channel faders at +3dB, the summing circuits will saturate more than if the channels faders are set to 0dB. With this parameter, you can control the amount of summing saturation. The valid range is -6.0 dB to +6.0 dB and the default setting is 0 dB.
Note: The Drive parameter faithfully emulates the behavior of a fader on a real hardware console when the Drive value is between -6 dB and +2 dB. The Drive range is extended and goes beyond its hardware counterpart, allowing creative processing when the value is between +2 dB and +6 dB.
list-image
Tolerance. Simulates the component tolerances of the bus circuits. Even if all the channels in a mixer are in theory equal to each other as they are composed by the same electrical components, in practice these components can be slightly different among the channels. For example, a 2Kohm resistor could be 1.98Kohm on channel 1, 2.03Kohm on channel 2 and 1.99Kohm on channel 3, and so on. By enabling the Tolerance switch, the Console Emulator module will sound slightly different on different channels. These differences are saved into the song state, so it can be recalled when you reload the session.
The audible results may appear subtle when first using the Console Emulator module. In fact, you may not hear any difference at all at first. This is especially true if you insert the Console Emulator module after you have already mixed a song.
The effect is subtle when listening to individual tracks or buses. Keep in mind that the effect is accumulative, so the effect will become more noticeable as you add Console Emulator to multiple tracks.
The trick is to insert the Console Emulator module before you start mixing. All your mixing decisions will then be made based on having the Console Emulator module in the signal chain. When you are done mixing, you can globally enable/disable the Console Emulator module to A/B the results, and you will likely hear a noticeable difference.
list-image
You will typically want to insert the Console Emulator module as the first module, and make sure ProChannel has Post FX Bin disabled. However, you can also experiment with placing the Console Emulator module at the end and enable Post FX Bin, so all your effects and processed sound are affected.
list-image
Add the Console Emulator module to all audio tracks and buses across your project, and use Quick Groups to easily control multiple instances simultaneously. To do so, select all tracks, then hold down the CTRL key while you insert or modify the Console Emulator module.
Tip: Add the Console Emulator module to the default ProChannel layout. This way, the Console Emulator module is always available on all tracks. Use the same console mode on all tracks and buses.

Copyright © 2024 Cakewalk, Inc. All rights reserved
Sitemap | Privacy Policy | Legal